2 Common things for all projects
In this chapter we will describe piece of code that is common for all projects. It includes some technical convenience code and consent and demographic form.
2.1 Convenience code
Usually all your projects should start with the following code. PennController.ResetPrefix() allows you to write most of commands in a shorter way. “// DebugOff()” is a commented line because it starts with “//”. It means that this line of code is disabled unless you remove the “//”. Remove it and you disable debugging menu while anyone participates at your experiment.
PennController.ResetPrefix()
// DebugOff()
There is a Sequence() function with arguments in the brackets. This command puts a strict way to execute logical blocks and other commands of your project. Some of the arguments are in quotation marks (they can be like this “” or this ’’, doesn’t matter). These are blocks that we insert later in the code. Words in quotes are names of the blocks we are free to change (but we have to change the names both in the sequence function and below in the code!).
We also see the SendResults() command before the “end” block. Unlike the blocks in the code, this function can be found only in this line. It writes down all the data gathered from a participant so far to the results file.
Sequence("instructions", "experiment", SendResults(), "end")You can add randomization to your trials within this line. For example, if we want to present our experimental task in a random manner we can write this:
Sequence("instructions", randomize("experiment"), SendResults(), "end")2.2 Consent and demographic form
Header – is a command that maps commands on Trial elements. In other words, you write something for Header and it is automatically applied to each of Trial elements (which are our logical blocks of experiments).
In this particular case we declare two global variables AGE and SEX. Then, we use the .log() command to store a variable named “AGE” as a value of “age” column in our future dataset and the same with “SEX” and “sex”. It is convenient since we will not need to write the .log() commands for all experimental trials again.
Header(
    newVar("AGE").global(),
    newVar("SEX").global()
)
.log("age", getVar("AGE"))
.log("sex", getVar("SEX"))
Most probably you would like to collect some demographic information about your participants at least their age and sex in order to make your sample more representative. The way I prefer to do it is with uploading some html document with a small questionnaire. The sample html can be found with experiments’ templates. You should upload it into the Resources area of your project, afterwards you can open and modify it in your project.
The chunk below has several aims: 1) it prints out the html questionnaire uploaded into the environment 2) it checks whether a participant filled mandatory margins otherwise red-colored warnings appear when the ‘continue’ button is pushed 3) A getVar().set() command fetches the value filled in the form’s margin with the corresponding name and assigns it to the variable we declared in the Header(); we extract the values with the jQuery library.
newTrial("instructions",
// 1) print the questionnaire
newHtml("form", "form.html")
    .print()
    ,
// 2) check completeness
newButton("continue")
        .center()
        .print()
        .wait(getHtml("form").test.complete()
          .failure(getHtml("form").warn())
          )
    ,
// 3) assign values from the form to declared variables
    getVar("AGE").set(v=>$("input[name='age']").val()),
    getVar("SEX").set(v=>$("input[name='sex']:checked").val())
)
2.3 Organizing an experimental list
As you remember the project environment allows you to upload supplementary materials into the ‘resources’ area. Your materials can be various files: audio, video, pictures (check out other templates on the platform). Most frequently you want to use your list of sentence and question stimuli.
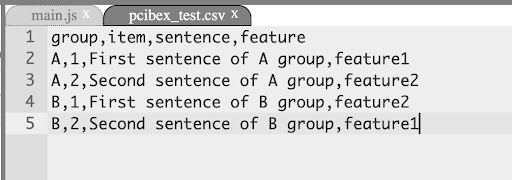
Most probably you construct your stimuli in a spreadsheet like Excel or Google-documents. First, the .csv format is the only possible way to read the stimuli file in the project. Most of spreadsheet applications handle exporting your data to the .csv. Perhaps, you will just need to pay a bit extra attention to the fact that the separator in your eventual file is an actual comma because sometimes .csv export function separates values with semicolons instead. Anyway, you can fix it easily in the project environment with the auto-correction.
Second, your file should have a specific organization like on the figures below. The first row contains headers, each column is a one variable, all columns are placed tightly, and have no empty columns within them. Besides stimuli sentences we can add any other column for our convenience. The program will ignore them unless we say the other. For example, we can make a column "feature" where we will mark which variable's value is presented in the particular stimulus.
If you have multiple experimental lists you can separate them in the same stimuli file. In order to do this, make a column named "group", the code will automatically identify that your file contains several experimental lists and will equally distribute your participants among experimental groups. It means that you don’t have to make several projects for each group of participants.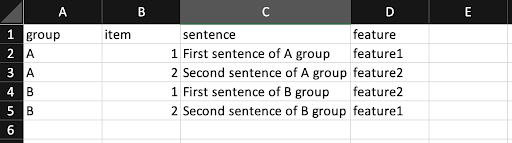
2.4 Finishing slide
Let’s jump into the ending of each project. It is pretty simple. You will need to declare a new logical block with newTrial() command and write some code within the brackets. Usually I write some thanksgiving or code for people from the crowdsource within the newText() command. You can prettify any message in your code with html tags withing the messages or with some css styling within the .print() command.
newButton().wait() command allows you to stay your participants on the slide forever. It creates a new button and pauses everything until a user interacts with it but it doesn’t print it out, so no button actually appears on the screen.
newTrial ( "final" ,
    newText("The experiment is over. Thank you for participating!<br>You can now close this page.")
        .print("center at 50vw","middle at 50vh")
    ,
    newButton().wait()
)